Popular Posts

Sunday, November 27, 2011

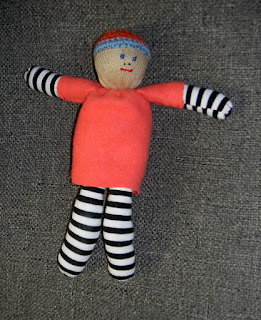
Toy Society 2011 Christmas Drop, Toy # 5, Little Striped Guy


This is my all time favorite kind of toy to make. He is made of pieces of fabric and scraps of stuffing that 99.9% of sane people would toss into the round file. But not me! I have this overwhelming compulsion to make "stuff" out of "nothing." Thus, I save everything and throw away nothing!!! I am every neatnik husband's worse nightmare!! (Bwah ha ha ha ha!!!!)


Friday, November 25, 2011

Toy Society 2011 Christmas Drop, Toy # 4


This is my unfinished fourth toy for the Toy Society's 2011 World Wide Christmas Drop. She is made  mostly from scraps, with a little of my hand-dyed fabric for her body/shirt. Her dress is made from a cut-up baby dress from a thrift shop. I look at thrift store clothing with a different eye than most: I see them as raw materials for my toys (I am partial to stripes and polka dots), whether it be a wool cat or a small doll, or doll clothes. I really don't like sewing doll clothes, so if I can shorten the process by making the clothes from other clothing, with ruffles already sewn, that appeals to me. All she needs now is arms.


She is a "keeping doll" as the pocket from the baby dress forms the front of her dress. It can hold all sorts of things: baby teeth, rings, coins, pictures, notes, etc.

Blue Sock Monkey Ballerina


I'm leaving her at Six Rivers Gallery tomorrow.

Wednesday, November 23, 2011

This Year's Christmas Drop Toys, one, two, and three


Here are my first three toys for the 2011 Toy Society World Wide Christmas Toy Drop:

 I thought a baby might like this silky kitty toy.

 
This chubby softy was made from little scraps of fleece someone gave me to stuff dog beds with, and some of it WILL go there, but some of  it was meant for a higher purpose, I thought.

This funny girl was made out of repurposed materials, too. Her hair is made of fleece "strings" also meant for dog bed stuffing, but hey, it made great hair for her!!

I don't spend more than a couple hours on each toy, but making something out of nothing is a habit of mine, and I find it endlessly entertaining and challenging, too. What can I say?! I'm easily entertained!!

Tuesday, November 22, 2011

My Third Christmas with The Toy Society


This will be my third year participating in The Toy Society's World Wide Christmas Drop. I have enjoyed doing this so much! I make small toys that I can finish in a hour or two, and I leave them around our town for people to find. Last year, a little boy found a toy I left in a supermarket shopping cart, and his mom sent a picture of him with it to The Toy Sociey. It made me feel so good to know that I'd made that little kid's day!  Here are some of the toys I've dropped before:


http://thetoysociety.blogspot.com/

Sunday, November 20, 2011

It's a Snowman Invasion!!!


Only one snowman is finished, and I'm sure you can tell which one that is. These are fun and easy to make: just get a jar, paint the inside white, allow to dry, fill halfway up with sand, paint a styrofoam ball white, glue to top of jar. (The short snowman is an old-fashioned light bulb, covered with PaperClay.)
I made the noses with PaperClay, and I poked a toothpick up inside them while they were still soft, (and then removed it). When the noses were dry,  I glued a tooth pick inside each one, and painted the nose orange. 
When the paint was dry, I  put a little glue on the back surface of the nose, and pushed the toothpick inside the head. Using a toothpick inside the nose takes a little longer, but you will be rewarded with a nose that will not break/fall off easily.
Do the rest as you choose. Some of mine have cloth hats (toes of socks make great, no-sew hats), some have mouthwash cap hats with margarine-tub plastic brims. You can also use premade straw hats, cowboy hats, etc. You can make neat hats out of felt, too. Or you can leave your snowman hatless. I like mine to have pink cheeks, so they look healthy! I like buttons on the front of mine--you probably noticed that.
Anyway, have fun with these! Do them with kids! Everyone will have fun.

Saturday, November 19, 2011

Cloth over the PaperClay Shouldhead Now


You will laugh when I tell you what I used for her cloth overlay. I wanted the thinnest knit fabric I could find, so I went to my underwear drawer and found the rattiest, thinnest, most worn pair of underpants I could find. They were pretty shabby, but just what I needed to use on this shoulderhead.

I use a brush to spread Elmer's Glue on the head, making sure to get the glue in every crack and crevice. Then I lay on the fabric and stretch it just a little where it needs to be to lie pretty flat. I trim off parts of the fabric, and make the cut piece lay against the adjacent piece as well as is possible.

I will use gesso next, perhaps a couple of coats will be necessary, and sand lightly in between coats, and after the final coat.

Friday, November 18, 2011

Made a Hitty Shoulder Head tonight.

The head part is about an inch high, and the measurement from chin to bottom of shoulderplate is probably an inch and a quarter. She's going to be a Hitty so she should be about seven inches high when done. I will make her a cloth body and probably cloth arms and legs, too. I will probably cover the head and shoulder plate with thin cloth before I paint it. Cloth adds strength to the Paper Clay.

Thursday, November 17, 2011

A New Peg Wooden

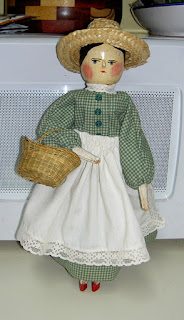
I have added another peg wooden doll to my collection (of two).These dolls were also,  mistakenly, called "Dutch ' dolls," a misunderstanding of "Deutch" dolls, meaning "German" dolls. They were made in Grodner Tal (valley) in Bavaria, which, at times, has been part of Austria and other times part of Germany. They were made in sizes from 1.5" to 17" and I believe that one person painted them all, as they all certainly look "related."  The two dolls I own are both 11.5" tall, and many I've seen for sale are also this size, so I am assuming that perhaps more were made in this size than any other. The dolls were quite crudely made, turned on a lathe,  of wood that reminds me of kindling!  They were always sold without clothing. The paint used contained lead, and, according to an article I have, the woman who painted them used one color a day, so the paint had time to dry overnight.

   I had never seen these dolls before I was shown a couple by a friend, but later, in reading Beatrix Potter's Tale of Two Bad Mice, I noticed one of the doll house dolls was a peg wooden named "Jane." So I named my first pegwooden (below) "Jane," too. She was given to me by my friend, who had two, and she gave me Jane in return for making an outfit for the doll she kept.


  These dolls were often sold in "Penny Stores" in Britain, the equivalent of our "Five and Dimes." Queen Victoria and her governess dressed many of these dolls after characters they saw in plays or operas. I really like these dolls because they are quite simple and  were made to be purchased by "regular"  folks who could not afford the more elaborate china head dolls that were available during the same time period (1850-1900).

Friday, November 4, 2011

Funny Duck!!

Actually, this duck is not left over from Halloween, nor is he traveling incognito. What he IS doing is holding a Hitty Face until it dries (I hope I can get it off easily tomorrow--I didn't put any plastic wrap under the clay like I usually do).  I use PaperClay because I really HATE Sculpey. I don't like having to bake it and I don't like how brittle it becomes, either. I also don't like how hard it is to wash off my hands or how heavy it is. Do you get the idea that I REALLY DON'T LIKE SCULPEY??!!
 I DO, however, LOVE PaperClay. It is light, it air dries, and although it has a tendency to crack, this doesn't matter to me because I always use it under cloth. I am also experimenting with using a face mold lined with knit cloth soaked in gesso and with just a thin layer of paper clay over that--the paper clay will be BEHIND the face when I remove it from the mold. I have used PaperClay behind my last couple Alabama Babies' faces, but I used quite a thick layer of it, and it made the babies' faces heavier than I wanted them to be, although much lighter than the plaster of paris that I first used, or the Sculpey I tried after that. Making dolls is an evolutionary process, which is one reason I like making them so much. There is no end to the things you can try and the places you can go.

Thursday, November 3, 2011

Finished Sock Monkey for Hittys

He is sewn from Red Heel Sock scraps. I used satin stitch with red embroidery floss to make his smile. Although Hitty Connie doesn't look very happy, she LOVES her sock monkey.